
Balance
February, 2026
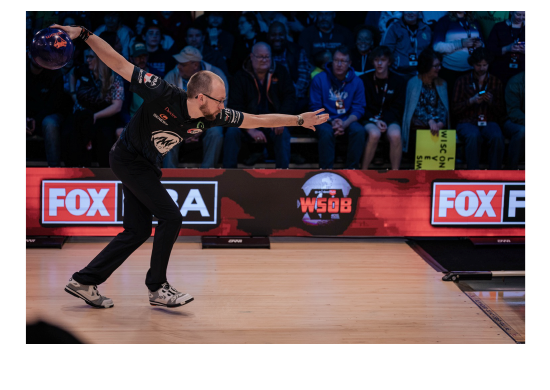
One of the most important things at your release point is how in balance you are. When in balance you have the best chance of delivering a quality shot. When out of balance you can still roll a good shot, but the chances of repeating are less and the ability to repeat shots with different releases and playing the lanes from different angles becomes much harder.
One uncomplicated way to check to see if you are in balance is to take a rear-view video of yourself going to the line. Take a screen shot of yourself at release and then draw a line from your non-bowling shoulder straight down to the middle of your sliding foot which ideally would be directly under your shoulder.
If your balance line extending from your shoulder to foot is more between your shoulder and head, you would be better to play straighter. If your balance line extends from outside your shoulder to your foot the less range of play you have and you have to be stronger physically to be able to make consistent shots.
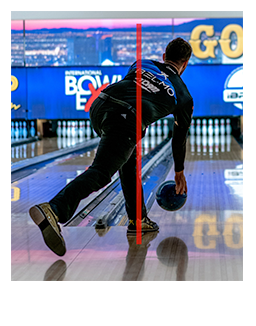 Jason Belmonte and EJ Tackett have ideal balance lines. Parker Bohn III’s is between his shoulder and head and Anthony Lavery-Spahr’s balance line is outside of his shoulder. Jason Belmonte’s position at release is in the perfect position for maximum release and lane play ability. At release point it looks effortless because he is in such good balance.
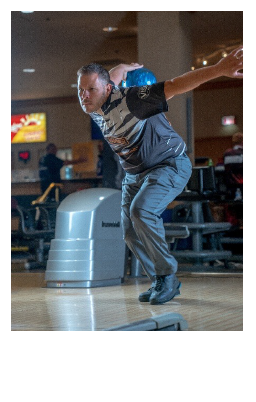
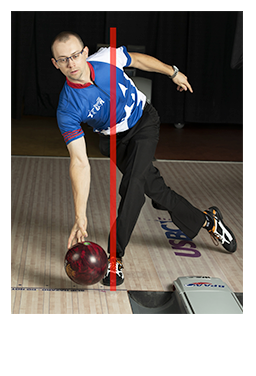 EJ Tackett’s picture is a frontal view, but it’s easy to see why he is so good—his balance line allows him to have maximum leverage.
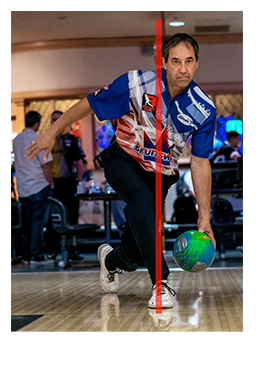 Parker Bohn, III’s balance line is between his shoulder which is better for straighter players. His “A” game is playing straighter angles, but he has won from everywhere on the lane.
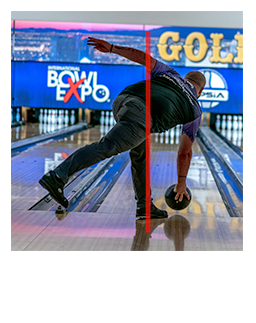 Anthony Lavery-Spahr’s balance line makes him less consistent than Jason, EJ or Parker, but his impressive record of winning 12 PBA Regional Titles, being a 2-time PBA Southwest Region PBA Player of the Year and winning a USBC Team Eagle in 2014 as a member of the Artistic Expressions I team who shot a still record 3,720 score shows it’s possible to be very successful with less than perfect balance. Anthony just has to be more physical to be in balance at his release point. You can see in his picture how much more physical he is at his release point than Jason, Parker or EJ.
The bottom line is the better your balance is, the better you can repeat shots and score higher.
Spare Shooting System
January, 2026
Spare shooting is the backbone of bowling. Having a solid spare shooting system is critical to success day in and day out. Your system should be based on logic not trial and error.
The 3-6-9 spare shooting system has been the gold standard for rolling spares since it was developed about 60 years ago. It is based off your strike line, where you stand and target at the arrows, by only moving your feet and keeping your strike ball target.
The 3-6-9 Spare Conversion System for Right-Handers
2 pin—move 3 boards right
4 pin—move 6 boards right
7 pin—move 9 boards right
3 pin—move 3 boards left
6 pin—move 6 boards left
10 pin—move 9 boards left
The 3-6-9 Spare Conversion System for Left-Handers
3 pin—move 3 boards left
6 pin—move 6 boards left
10 pin—move 9 boards left
2 pin—move 3 boards right
4 pin—move 6 boards right
7 pin—move 9 boards right
This system was developed when there was very little oil on the lanes and the bowling balls didn’t hook like today's balls. Today the 3-6-9 system today is not as reliable with the amount of oil that is applied to the center of the lane and how much the balls hook. As an example, (RH) moving your feet 3 boards right to make a 2-pin hooking the ball across that oil is very difficult. With today’s house conditions when you miss left the ball can miss right and when you miss right the ball can miss left.
On house conditions I have my high school players (RH) move 5 boards right for the 2-pin. This helps start the ball more in the dryer part of the lane in the heads which will make the ball hook early into the oil so when it hits the oil it’s rolling and has lost some rotation to create a more predictable ball reaction. The 4-pin would be 8 boards right and the 7-pin 11 boards right. These numbers can change based on the bowler's individual idiosyncrasies—I adjust my high school bowlers differently depending on their tendencies. For right side spares I have a variety of ways to play the spares—but it would take a book to write about all of them here—so overall straight is best.
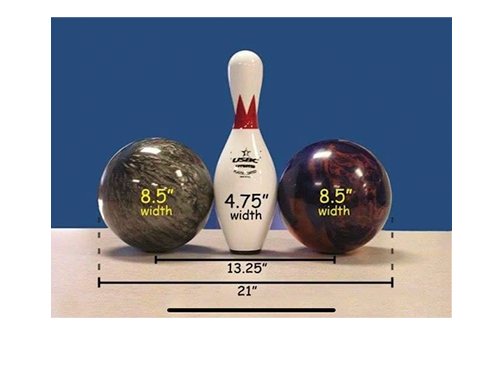
The key to any spare system when you are hooking the ball is that it needs to be based off your strike line. If you are playing the lane correctly, it will provide you with the largest miss room. You have more area than you think to make a single pin—you have the width of the pin coupled with the width of two bowling balls—~21” which equals about half the width of the lane.
BIt’s best to roll a straight ball to use the 3-6-9 system today which is what the majority of high-skilled players that bowl in tournaments on varying oil patterns and lane surfaces do. By rolling the ball straight the oil pattern has no influence on the ball's direction.
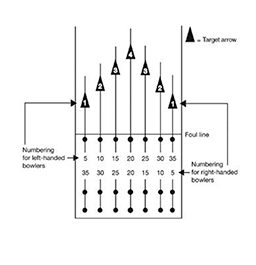
Rolling it straight you will need to know where you stand and look for the 10-pin and 7-pin first. Then use the 3-6-9 based on those two pins. For example, if you stand 35 and look at 17 for the 10-pin and make it, the 6[pin will be 32 and the 3-pin will be 29. You can then adjust your personal numbers from there.
It’s important to develop a reliable spare system based on board numbers on the approach and arrows. You should never look at the pins, lots of things can go wrong physically rolling a ball doing that because the pins are about 60 feet from the foul line. The arrows are about 15 feet from the foul line—it’s much easier to hit something closer than farther away.
This graphic below makes it easier for you to visualize the numbering I am talking about. Plus it includes the flip for left-handers.
Grip Types
December, 2025
What type of grip should you use? Conventional, semi-fingertip, fingertip, or a combo of them? Whether one or two-handed, a variety of grips are used on the PBA Tour.
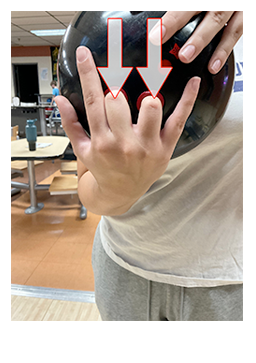 Very few PBA pros have used conventional grips with success. The conventional grip is when both the middle and ring finger are inserted to the second finger joint. But back in the day, the late, great “Mr. 900” Glenn Allison used a conventional grip his whole career. Today the only one-hander that uses a conventional grip on the PBA Tour is Jacob Butturff.
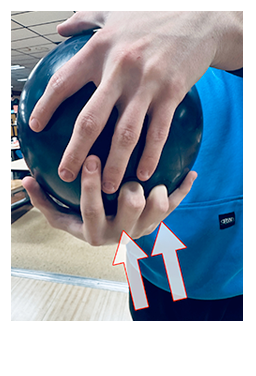 The semi-fingertip grip is very common with two-handers and Jason Belmonte is a good example. The semi-fingertip grip is when both the middle and ring fingers are inserted between the first and second joint. A couple of notable “old-school” one-handed players that used a semi-fingertip grip are the great Chris Barnes and Mike Aulby.
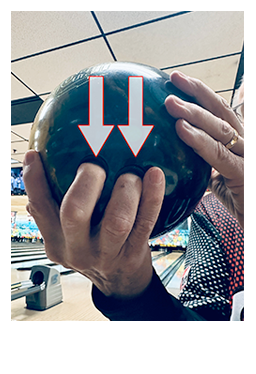 The fingertip grip is used by more experienced bowlers—most beginner bowlers balls are drilled with a conventional grip, but I have always suggested to my students they immediately go with a fingertip when they get their first bowling ball drilled. I feel that going straight to a fingertip eliminates them having to get used to a fingertip when they get more experienced.
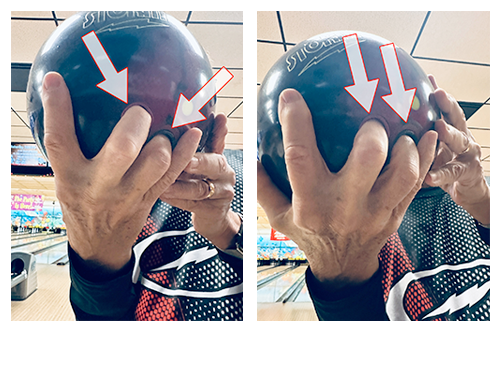
There are players that use a semi-fingertip grip in their ring finger and a fingertip grip in their middle finger—and this is commonly called a dropped ring finger grip. Kyle Troup actually does the opposite—he inserts his middle finger a little deeper—more towards his second joint—and his ring finger he inserts into his first finger joint.
Basically, inserting your middle finger deeper will help you turn the ball more and inserting your ring finger deeper will help you stay behind the ball more with less turn.
Many PBA pros retool their grips to help with the release they want to achieve. Personally, I changed my grip a lot, sometimes it was OK and other times not so good—but I learned a lot by experimenting. My old buddy, the late, talented, PBA and USBC Hall of Famer Pete Couture would change his grip every few years to something he felt would help him achieve the release he wanted. Chris Barnes does the same thing—he makes slow changes, but always with a purpose in mind. Keep your mind open to adjusting things and if it’s not working, trying something different is always an option.
There's an old saying "you can't out bowl a bad grip", but fine-tuning your grip and/or experimenting the way you insert your fingers into the holes can get you the result you are looking for. But I will warn you about making major grip changes regularly—if your grip never feels right it’s probably something off with your approach, set-up, stance, or swing that is causing it.
Heel-Toe Incline
November, 2025
One of the least thought about parts of our bowling form is the type of steps we take. We normally think about the speed, direction, and length of the steps.
The incline of the steps is very important for an efficient smooth flowing approach that gains momentum as we go to the line. Tom Kouros, the Hall-of-Fame Author and Coach, wrote about foot incline in his ground-breaking book “Par Bowling: The Challenge” which he wrote in 1976 and then revised in 1993. I was good friends with Tom, and I have referenced his book many, many times over the years. I’m fortunate to have an autographed copy.

Tom states in the book “The importance of the heels making contact with the approach surface first cannot be overstated. In this regard, biomechanic researchers have confirmed the high leverage merit of the heel-toe technique. There is one step that should not be taken heel-toe and that is the last step because in this step the toe makes contact first to start the slide.” This type of step technique was true 49 years ago and still is today.
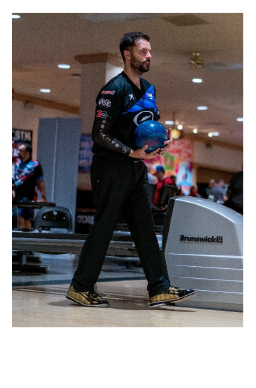
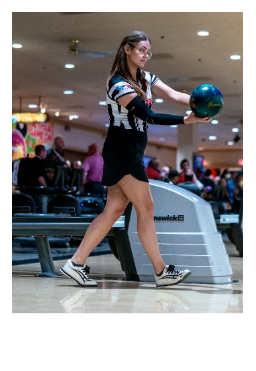
My pictures of pros Jason Belmonte, Daria Pajak, Bryanna Cote, EJ Tackett, and Bill O’Neill show the sequence of steps in a 5-step approach because it’s what the majority of professionals take. But regardless, if you take more or less steps the same heel-toe approach is recommended with each step until your final step which is your slide.
The key thing to remember about the heel-toe footwork is when the heel of your leading foot makes contact with the floor your trail foot’s heel is coming off the floor to allow for a smooth transfer of your body weight forward. When your lead foot lands flat, your trail foot should be on the tip of your toe, so your body is over your leading foot.

Follow-Through
October, 2025
One of the big things I see bowlers do a lot is they pull up on their downswing and at their release. Much of this stems from the notion that their follow-through should go up and their hand should end up behind their head.
Most bowlers think that the follow-through is the end of their shot. The way I look at it, the follow-through is the hand extending through the ball until it is off the hand. The finish is where the hand ends up through momentum. The hand needs to go through the ball on a descending angle out onto the lane using gravity to complete the turn through extension.
The problem is when bowlers try to have their hand go straight up at their release it straightens up their spine angle which causes them to hit up on the ball instead of extending through the ball.
All the best pros increase their spine angle from the top of their swing through their release. This enhances their ability for their hand to follow through the ball. I remember the great Earl Anthony once told me he liked to feel his hand “chase” his ball down the lane. If you concentrate on having your hand follow your ball down the lane while maintaining your forward spine tilt it will increase your accuracy and hand action. Remember, the follow through is your hand going through the ball, the finish is where your hand ends up through natural momentum, not forced.
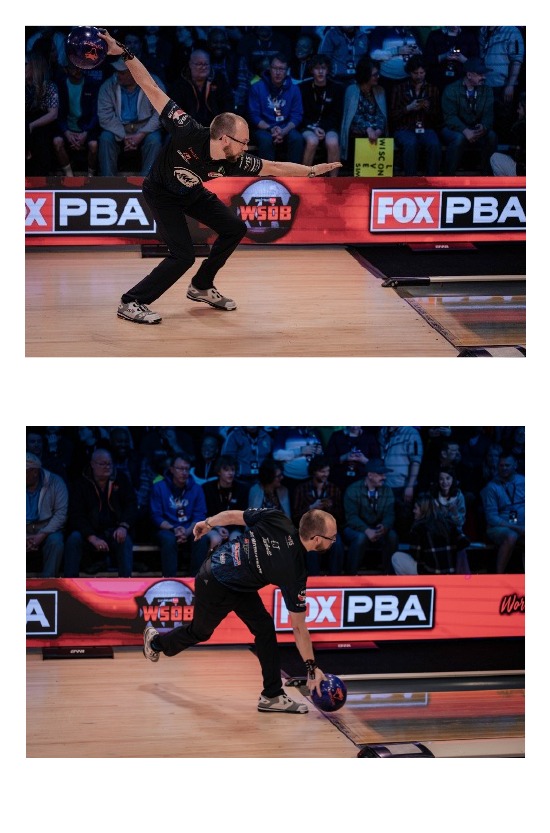
There are three key places during your swing that you should concentrate on to make sure your swing is in line.
Swing
September, 2025
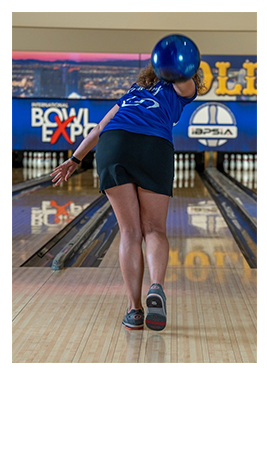
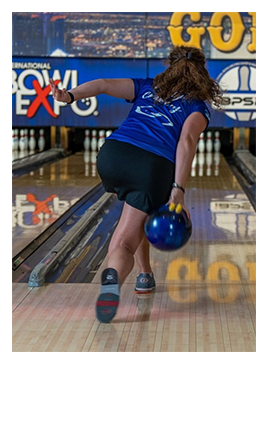
One of the most important, if not the most important thing, you should work on in your game is your swing as a good swing is the foundation for everything else that happens. With the ease of today’s phone and tablet video recording ability it’s easy for you to see your swing by recording it from the back. I’m using PWBA star Verity Crawley in my examples here as she has a great swing—one that you can learn from and hopefully emulate in your own game.
There are three key places during your swing that you should concentrate on to make sure your swing is in line.

Ringing 10 vs. Weak 10
August, 2025
This was the second of a 2-article explanation of bowling words, terms, and descriptions that are good to know. I am zeroing in on two terminologies—Ringing 10 and Weak 10 which describe two different ways you can leave a 10 pin after you roll your first ball each frame.
The pins tell us the story of our shots. You need your ball to hit the head pin with enough angle and roll so that when you hit the pocket your ball needs to get to the 5 pin to increase your chances of striking.
One of the most important things you can do on every shot is to watch your ball go through the pins and exit the pin deck. The information you receive by doing this tells you a lot about why you strike or not.
First off if your ball hits the head pin slightly off center it makes your ball deflect into the 3 pin (this is for right-handers; left-handers need to reverse this to their 1-2 pocket) the ball will then deflect off the 3 pin into the 5 pin which is critical for the ability to strike. When the ball gets to the back row of pins it should have contacted 4 pins—the 1-3-5-9—for a strike. (1-2-4-8 for a left-hander).
If pin/pins are left standing, something wasn’t right about the strike. It’s not bad luck—it’s just not the proper combination of things that need to happen to strike. It doesn’t mean you didn’t make a good physical shot, it’s just something was a little off which requires you to make small adjustments at times or just roll the same shot again because we are not perfect machines and something very small can be different without us even feeling it. Leaving the 10 pin (7 pin for lefties) is especially frustrating and the most common pin to leave when hitting the pocket. There are 2 ways that you can leave a 10 pin (7 pin for lefties). The first is the ringing 10 (7 pin for lefties) on a solid pocket hit.
 The main reason this happens is the ball is still sliding when it hits the pocket and the ball deflects a little too much off the head pin. When the ball hits the 3 pin (2 pin for lefties) it causes it to hit the left side of the 6 pin and then the 6 pin goes around the 10 pin (for lefties hitting the 4 pin on the right side causes it to go around the 7 pin). Some adjustments for this are using a ball that rolls earlier, slower ball speed or moving right (left for lefties) to get the ball to the lane friction sooner.
 The other common 10 pin leave is called the weak 10, (weak 7 for lefties) which occurs when the ball hits half pocket losing a lot of energy and can’t drive through the pins. The ball deflects more than the ringing 10 (ringing 7 for lefties). The adjustment for this is to get your ball to break later so it retains its energy for a later breakpoint. This can be accomplished by changing to a ball that goes longer, increase your ball speed, or moving more into the oil on the lane to delay the hook.
 On a perfect strike there is still deflection, but the ball exits the pin deck a little left of the 9 pin (right of the 8 pin for lefties), commonly referred to as splitting the 8-9. Here’s an example of the ball exiting the pin deck the best way.
The arrows on all 3 examples are to show the angle the ball is entering the pocket. The least angle is the weak 10 (weak 7 for lefties), the ringing 10 (ringing 7 for lefties) has a little more angle and the perfect strike shows the most angle.
For most it’s very difficult to see the difference in the entry angle, which makes it very important to watch the ball exit off the pin deck. If you learn to watch how your ball leaves the pin deck it will make it easier for you to decide the adjustments you have to make to strike.
Preparing for the Fall
July, 2025
This is the first of a two-part tip on bowling words and terms that are good to know. My Bowling Digest article is broken down into five categories—1) Bowling Balls; 2) The Lane; 3) Lane Conditions; 4) The Delivery; and 5) Playing the Lanes and each categories explains “buzz” words you will hear bowler’s use. And with mid-summer fast approaching, I’m going to zone in on three of the categories that were featured 1) bowling balls; 2) lane conditions; and 3) the delivery because it’s time to start thinking about the upcoming fall league season.
For some the summer is a time for a bowling break while for others it’s the time to work on their games by getting lessons, bowling on challenging lane conditions or bowling tournaments for more experience. Whatever you have done this summer it’s time to consider how you should prepare for the fall.
BOWLING BALLS
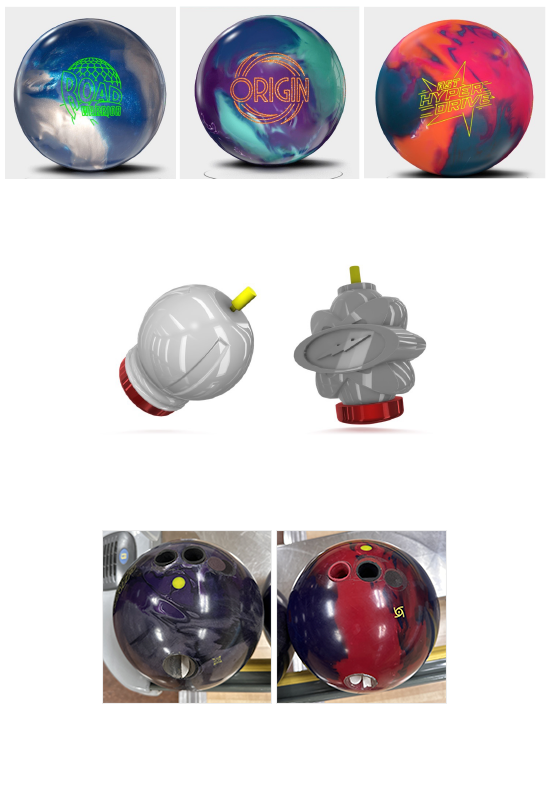
Everyone should consider bowling balls first. Are you adding to your arsenal or replacing what you have? In selecting a ball you need to consider three things 1) should the ball have a pearl, hybrid or solid cover stock? 2) should you get a symmetric or asymmetric cored ball? and 3) the location of its pin for performance. Don’t worry if you have no idea what any of these things are—a good pro shop will be able to help you with these decisions. But it will be helpful to your pro shop operator if you have some knowledge of what you are looking for the ball to do or to compliment what you already have.
LANE CONDITIONS
Secondly, it’s important to learn what the lane conditions/patterns you are going to be bowling on in your fall league—is it going to be the same as last year or change this year? Ask your bowling center manager/proprietor if they are planning to make any changes. Knowing this will make it easier for your pro shop operator to suggest which ball you should buy or one to add to your arsenal.
DELIVERY
The third thing you should think about is your delivery which incorporates your stance, swing, footwork release and finish. The key thing is you should work on getting your delivery to feel smooth and effortless. Many swing and timing issues can be solved if you can get your ball to roll smoothly with the least amount of physical effort. So try to make your practice sessions as physically effortless as possible—let your ball control your swing—not you controlling your ball. Move on the approach and lane to get the angle to hit the pocket based on what the lane condition calls for, not what you want to do.
I always suggest to my students that the one time they should definitely get lessons is about a month before their league starts. This is to make sure you didn’t develop any bad habits over the summer or have your bad habits creep back if you took the summer off.
If you start now to prepare for your fall league—you’ll be able to “hit the ground running” when your leagues start in a few months.
Finger Positions
June, 2025
In bowling today, you commonly hear when someone doesn’t bowl well “I didn’t have the right ball”. Yes, the ball is a major part of bowling but many people look for the ball to do the job more than looking into their own game for a solution. Plus not everyone has the luxury of many balls to choose from.
Besides changing balls to hopefully get a better reaction on the lanes, using a few small grip changes can also help you create a different ball motion. Using your pinky and index finger are two tools that only require moving them without changing anything else in your set-up to help you get a different ball reaction. Many times, this is all it takes and this doesn’t require a lot of practice. Here are four suggestions:
1. Pinky Finger Next to Ring Finger, Index Finger Spread Away from Middle Finger
 The most common position used is the pinky finger next to the ring finger and the index finger spread out from the middle finger. This position gives you a firm grip and the spread of your index finger positions your ring and middle finger at an angle helping you rotate your ball more. Thinking of your ball as a clock your pinky finger is next to your ring finger at 8 o’clock with your index finger spread away from your middle finger at around the 5 o’clock position. This is a good benchmark hand position and versatile to play a variety of angles.
2. Pinky Finger and Index Finger Close to Ring and Middle Finger
 Positioning your pinky and ring finger close to your ring and middle finger will give you a more relaxed grip and less turn. Your ring and middle fingers are at 6 o’clock. This is a good position to set your hand in one place in your stance then let your hand stay stable throughout your swing without grabbing the ball to control it. Let the ball swing your arm naturally—it will improve the feel of your ball throughout your swing and release. This is a good hand position to play around the second arrow.
3. Pinky Finger Spread Away from Ring Finger and Index Finger Close to Middle Finger
 To have more forward roll on your ball, spread your pinky finger out away from your ring finger and keep index finger close to your middle finger. Your pinky finger is at about 8 o’clock and your other fingers are at 6 o’clock. Spreading your pinky finger keeps your hand from turning the ball and this can help when you want to play straighter down the lane and roll straighter at spares.
4. Pinky Finger Tucked and Index Finger Spread Away from Middle Finger
 One of the best things to do to get more lift, loft and turn is to tuck your pinky finger and spread out your index finger from your middle finger. This tightens up your grip which naturally and positions your ring and middle fingers at about 8 o’clock which will help lift and turn the ball more creating a very strong grip. This is a great option when you have to move towards the middle of the lane because the ball track area is hooking early and there is carry down. This finger position will give you the lift and rotation to hook through or around the carry down.
Do some experimenting—these options can help you knock more pins down with the equipment you already have.
Ball Height Stance
May, 2025
When building your stance, a couple of considerations are how high to hold your ball in relationship to the speed of your steps and the height of your back swing.
If you have fast feet you want to hold your ball lower—a little below waist high. If you take medium speed steps hold your ball about waist high. For slower steps hold your ball about chest high.
Where should your hold your ball in relation to your swing height? A general rule of thumb is, the lower your back swing the higher you hold your ball, and the higher your back swing the lower you should hold your ball.
Your ball should be starting down from the top of your swing at the time you start your slide. This way your upper body, slide leg and arm are all going forward to deliver the ball.
You want to have the height you hold your ball in your stance compliment the speed of your steps and the height of the back swing. Do some experimenting to figure out what is best for you.
Below are three video examples that show 3 different ball height stances that complement each of their games. The first one features 3-time USBC Eagle winner and PBA champion Anthony Pepe who holds his ball high which matches up with his slow feet. The second one is my student Brianna Merner who holds her ball about waist high which is perfect for her medium speed steps and swing height. The third video is 3-time Team USA member and PBA exempt player AJ Chapman who holds his ball low which coordinates well with his fast feet and high back swing.
Anthony Pepe’s high ball position in his stance compliments his slow feet.
Brianna Merner’s waist high ball position works very well with her medium-high swing and medium speed steps.
AJ Chapman’s low ball position coordinates will with his fast feet and high back swing.
Loft
April, 2025
Using loft to adjust to the oil pattern as it changes is an important tool you need to be able to do. The amount will vary based on your abilities and the playing environment you are faced with.
As a general rule of thumb, on fresh oil conditions you need less loft; and on oil patterns that have transitioned a lot might require more loft.
On fresh oil conditions you have plenty of oil in the heads and mid lane, and bone dry backends. You don’t need to create skid and backend reaction. Rolling the ball early with minimal loft will decrease your turn and lift which will make your ball travel a straighter path and start rolling before it exits the oil at the end of the pattern.
When you are bowling league and the lanes start to transition you will need to start moving in or add some loft to play the same area on the lane. In tournaments you will be bowling more games so moving in is required. When moving in you need to increase your axis rotation to get your ball to hook later because the oil is being erased in the heads and is carried down to the back end. Adding loft will increase your axis rotation and will help you increase your turn.
Basically when your ball starts to roll early and not finish enough to get the corner pins (7 or 10) out, adding turn and loft is a good way to combat it.
Know what’s natural for your game then work on adjusting it as an adjustment tool.
Below are three examples of loft—and each level of loft is natural to each player—10-time PBA Champion Dom Barrett uses slight loft, 6-time Jr. Team USA member Annalise OBryant releases her ball more down into the lane, and 2-time PBA Champion DJ Archer lofts his ball way out on the lane.
10-time PBA Champion Dom Barrett releases his ball around 4-5 feet onto the lane with very slight loft.
6-time Junior Team USA and Team USA member Annalise OBryant releases her ball early and more down into the lane.
2-time PBA Champion DJ Archer natural style is lofting the ball way out onto the lane.
Knee Bend
March, 2025
About 40 years ago I got a question from the legendary Carmen Salvino—“What do you think about knee bend”? My response was it’s not all it’s cracked up to be. He said thank you and that ended our conversation about knee bend. Carmen didn’t have a lot of knee bend and at that time—back in the 1980’s—many notable coaches were all about deep knee bends.
When you go to practice have a plan. The first thing to think about it is how are you going to prepare to be ready to roll your first shot. Are you stretching or doing some physical warm up? Checking the fit of your ball? Checking your shoe soles, etc.?

The amount of knee bend varies among bowlers and the right amount is dependent on the bowler’s release. As a rule of thumb, the higher the fingers are on the ball at release, the more knee bend is needed along with less forward and lateral spine tilt. For players with their fingers well below the equator of the ball—two-handers who have their palm under the ball—less knee bend is needed, and more lateral/forward spine tilt is needed.
The right amount of knee bend is dependent on the bowler’s release, and it can vary as much as 25 degrees. It depends on when the bowler’s arm is perpendicular to the floor, when their arm is in line with their lower leg, when the bottom of their ball is ankle high or higher and the center of their ball is over their foot. You can see in the pictures that both Bryanna and Jason have their arms perpendicular to the lane along the lower part of their sliding leg with their ball over their feet. Slightly different but more similar than most people realize.
How To Practice
February, 2025
How to practice can take on many distinct aspects. You need to practice with a purpose to improve a skill—what you score is not important. Actual competition is the only time what you score is important.
With today’s bowling, as soon as the lane is turned on it will automatically record the first shot that your roll as a score. The problem with that is you might judge how you are doing based on your score that’s shown on the computer as it’s difficult to separate your score from the processes to make your game better.
When you go to practice have a plan. The first thing to think about it is how are you going to prepare to be ready to roll your first shot. Are you stretching or doing some physical warm up? Checking the fit of your ball? Checking your shoe soles, etc.?
The next step is how are you going to roll your first shot and from where. If you go full force on your first ball you probably have forgotten that score is not important when you practice and you’ll learn very little and invite injury. I always recommend bowlers to start out near the gutter with their first shots, roll the ball very slow and pay attention to what you are physically feeling and especially seeing what your ball does. There is much less oil near the gutter than the middle of the lane and the first thing you should do is to always look to see where your ball hooks the earliest and the most from.
If you are practicing with another person, you should put 1 initial/name in the computer and split the game. Bowler 1 bowls the odd frames and bowler 2 rolls the even frames. The next game reverse who goes first. This way there is no personal score, and you are not competing against a score and/or another bowler.
I also recommend that to get the maximum use of shots for each game roll at the 10 pin on your first ball, then a strike line on your second shot. Next frame go for the 7 pin on your first shot and then a strike line on your second shot. This method gets you comfortable rolling to the corners and you see how your ball reacts going cross lane.
Remember that every ball you roll is the building block for your next shot. Have a plan for each shot you roll.
Two-time Junior Team USA and Storm Evolution Staff Member Abby Starkey demonstrates how you should practice.
How Much Hook
January, 2025
How much hook is enough? and hooking the ball a lot is impressive!
I think young developing bowlers should learn how to hook the ball as much as they can with speed after they get some basics down. A lot of good things can develop in their game if they can learn to hook the ball with speed.
For one-handers to get speed, the ball needs to get into their swing early which gets their feet moving faster naturally creating momentum. And then they can develop a swing where their ball when at its peak in their approach is at least 1 ball width above their head.
Two-handers speed is even more important because they have a naturally good release with their palm being under the ball, and this creates an increased rev rate which needs speed to be effective. Once a player develops power they can start refining their form to smooth things out. As time goes on all players that hook the ball a lot eventually learn also how to roll it straight to be able to play the different angles that oiling patterns require.
A basic rule of thumb is if the pattern has a blended side-to-side and front-to-back oil pattern the more a large curve has a good chance to be productive. On the other side if the oil pattern is wet-dry side to side with very little blend with limited front-to-back down lane blend, straighter shots work better. Flatter patterns side-to-side and front-to-back also require straighter angles.
This basic way of playing lanes is based on fresh oil. As the pattern transitions the types of bowlers playing on it and balls being used will transform the pattern from what it started out as to something different. And the more games that are bowled, the more the pattern will change.
Learning how to understand a lane graph will help you in deciding whether a pattern is one you can hook on fresh oil or is it a pattern you have to go straighter on. The two patterns shown below require totally different amounts of hook to be used. The Pete Weber pattern has a lot of blend in the oil side-to-side and front- to-back which allows you to curve the ball more, aptly names after Pete who slow hooked the ball the best ever.
The other pattern—Wolf—has very little blend and is very defined where the most oil and least oil is so this pattern requires rolling the ball very straight to start.

Changing Ball Rotation
December, 2024
To play the game at higher levels you need to be able to change your ball rotation. Just changing bowling balls is not enough. Mixing and matching ball rotation and the ball to play the angle the pattern calls for at the time it does is the key to success.
A basic rule of thumb to follow on fresh oil you need less axis rotation/side roll. The pattern has plenty of oil at the beginning of the pattern and dry back ends. The key is a forward rolling ball will give you front to back and side to side control. A release that produces a lot of axis rotation makes it difficult to control the ball when it exits the oil either down the lane or side to side, the ball will make an abrupt change of direction.

On patterns that have transitioned from oil being erased in the mid lane of the pattern and carry-down created from spare balls moving the oil to the back end will require you to move more to the middle of the lane and swing the ball more. Arching the ball more will require more axis rotation so the ball can hook through the carry down or around it.
The key to playing lanes is the ability to change axis rotation, angles, and the ball at the right times to succeed or even survive when it is not your best way to play the lanes.
Building Your Stance
November, 2024
One of the biggest things I see in bowlers who come to me for lessons is that they pay very little attention to building their stance. Every one of your shots is important so using the same way to build your stance helps make everything that happens after it more consistent. It all starts when you 1) pick up your ball, 2) position your feet, 3) setting your upper body with the correct posture, and 4) putting your fingers in your ball and setting its position. The video below that I did for the Storm Evolution program gives you a good system on how to build your stance. Not everyone has to do it the same way, but you need to have a uniform way to start each of your shots which should help bring you higher scores.
Building your stance is important for consistency. This video shows you how to do it.
Target Direction
October, 2024
This month’s “Bill’s Tip of the Month” expands on the hitting my target question in this month’s August, 1996 Bowling Digest featured column.
I hear all the time after a student rolls a bad shot “I missed my target”. They say this instinctively because the ball ended up at the wrong place at the pins and they think not hitting their target was the problem. Actually hitting a specific board at the arrows is not as important as the direction the ball is traveling. You need your ball to start in the middle of the lane where the oil is and arc to the outside dry part of the lane to get your ball to hook back to the pocket with some angle.
You can hit your target at the arrows at different angles and your ball can end up at very different places at the pins. The key is what physically happened to make your ball travel in different directions even if you hit your target.
Virtually no one sees their ball hit the board they are looking at—more importantly is executing a good shot physically. A breakdown in your form will cause directional misses. If your ball is traveling in the right direction but breaks too late or too soon an adjustment on the lane is in order, but if your ball travels a different direction each shot, you need to make an adjustment with your physical game.
Every shot you make you must have a plan for it. The first two things are always 1) where you stand and target to align yourself correctly for the direction you want your ball to travel; and 2) how you want to release your ball.
With a plan you can think backwards from the pins to your form to understand how you physically rolled the ball to produce the direction your ball traveled and where it ended up.

Bend Elbow for Power
September, 2024
This month’s “Bill’s Tip of the Month” expands on the elbow bend question in this month’s October, 1996 Bowling Digest featured column.
For the longest time elbow bend in the arm swing was taboo. But going back to Don Carter in the 1950’s and 60’s, then Earl Anthony in the 1970’s and 80’s proper use of elbow bend was effective. Both Don and Earl players exhibited control while being able to get enough on the ball to carry with elbow bend throughout their approaches.
Starting in the 1980’s elbow bend was becoming the catalyst for the high rev players like Bob Vespi and Jimmy Keith to unleash powerful balls. They both exhibited a lot of elbow bend during their swings.
Fast forward to today, excluding the two handers, almost all the high rev players use elbow bend. The difference with the contemporary players is they have high back swings. Some of the high rev PBA players that use a lot of elbow bend are EJ Tackett, Marshall Kent and AJ Chapman. Many others use it in varying degrees. On the female side some that do it are Daria Pajak, Verity Crawley and Stephanie Zavala.

Using elbow bend is easier than cupping the wrist. You can have a very free swing going back without cupping your wrist, then on your down swing bending your elbow starts when your arm is parallel to the floor. This uses gravity which makes your ball feel lighter than cupping your wrist on your back swing.
With the need for revs and speed, a high swing and elbow bend are the two main ingredients for one-handers to develop the rev rate to keep up with the two-handers.
Speed vs. Control
August, 2024
This month’s “Bill’s Tip of the Month” expands on the speed vs. control question in this month’s February, 1995 Bowling Digest featured column.
With the very strong balls of today, speed is a very important part of being able to control your shot and carry. The cores and covers of today’s balls make them rev up fast and hook more—having the correct speed helps you keep your ball under control.
The key to speed is it needs to match up to your rev rate, turn and the lane conditions. You basically want your speed to be very consistent and on the firm side to be able to increase or decrease it a little without distrusting your consistency.
To increase your speed, it must come from increasing your momentum to the foul line. Using your hand and arm muscles to increase your speed doesn’t work as it usually disrupts the consistency of your shot.

The easiest way to increase your body momentum is to get your ball started sooner at the beginning of your approach. Doing this will increase your foot speed naturally because your brain “tells” your feet they need to stay in time with your swing which automatically causes them to speed up. The key to this is you need to let your arm swing back and through to your release and finish and not force it—like a metronome.
To roll your ball slower you need to move your ball slower at the start of your approach which will make your feet move slower and slow your swing speed down—but still with a metronome consistency.
Whether you want to increase or decrease your speed you don’t want to sacrifice your form. The most important thing of all regardless of your speed is the control and the consistency of your swing. Stay within the perimeters of your game for speed control and match up the right ball for your speed. If the best in the world can only control about a 2-mph difference from their norm in their speed up and down to be able to still make good shots don’t think you can do more!
Playing the Oil Pattern
July, 2024
This month’s “Bill’s Tip of the Month” expands on the mental game question in this month’s June, 1995 Bowling Digest featured column.
Finding the best place to play the lanes can be figured out a few ways. Most bowlers will go right to the area they are familiar with and play that area. The problem with that is you never learn anything about the pattern and could be away from the best place to play on the lane.
The first one thing you should always do is roll your first shots very close to the gutter and slow. You want to see how far your ball slides before it hooks, not caring anything about where it ends up. Then move 5 boards at a time for the next couple of shots and observe the length the ball travels before it starts to hook. All normal patterns have less oil near the gutter than in the middle of the lane and the key is to play along the area on the lane where the least amount of oil is and the most oil, commonly referred to as the oil line. This will give you the most miss room.
If there is a graph of the oil pattern of what you are bowling on you can use that also. Start out by playing the pattern where the lightest blue is on the pattern, just outside of where the darkest blue is. This way you’re starting where the least amount of oil is and then you can adjust accordingly along that area based on your ball reaction. Your adjustments can be ball selection, release selection for the appropriate ball rotation, slow down to play a little more in the oil or speed up to play the dry depending on your other selections.

There are three key factors to pay attention to on a oil pattern graph: 1—the length of the oil; 2—the volume/amount of oil; and 3—the shape of the pattern. To me the most important is the shape of the pattern as playing it correctly will give you the most area and control. The graph shown here is from the 2024 PWBA Greater Nashville Open and I’ve highlighted in the red boxes the 3 key things to look—1 the length of oil; 2—the amount of oil; and 3—where to play the shape of the pattern.
Mental Game
June, 2024
This month’s “Bill’s Tip of the Month” expands on the mental game question in this month’s December, 1996 Bowling Digest featured column.
Bowling is a game of misses, the smaller your misses are the better you are. Your mental game helps you understand the misses. The first order of business is to understand what you are trying to do so you can evaluate your misses and decide on a course of action to correct them.
There are three things to think about on every shot. What you are physically going to do, the line you are going to play and the ball you use. These are the 3 things you have to decide on with every shot.

Our job as a bowler is to play the lanes the right way based on the lane conditions, use the right ball to get the right reaction on the pattern to create the best angle to carry. This all boils down to our mental game, it’s our responsibility to figure out the puzzle to score. It’s not the ball or the lane conditions responsibility for our success. It’s our job as bowlers to figure out the best way to score or get the most out of our personal abilities.
Every ball you roll is the building block for your next shot, whether it’s a good result or bad. Paying attention to what happened or is happening is the key. Always have a game plan for each shot and be ready to adjust it based on ball reaction and carry.
Timing & Swing Height
May, 2024
This month’s “Bill’s Tip of the Month” expands on the speed and balance question in this month’s February, 1997 Bowling Digest featured column.
The ideal swing height varies as much as the different styles we see. The correct swing height to achieve a smooth flowing approach and finish is directly related to timing.
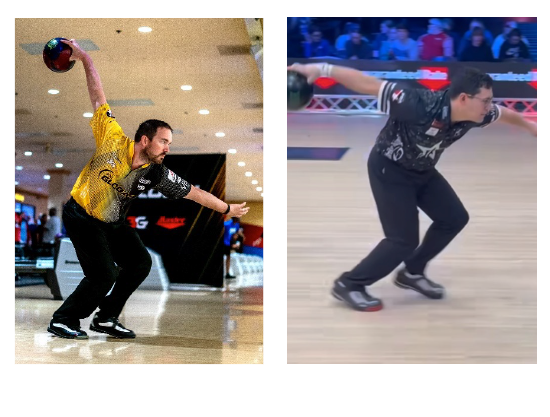
The key for an effective effortless release and finish position, your ball ideally should be ready to start the down swing as your slide foot is passing your bowling side foot. If your swing is still going up at the time your slide foot is passing your bowling slide foot your ball is going in the opposite direction that your slide foot is going. Not to say that your swing can’t be continuing up when you enter your slide, but it takes a lot of physical strength to make it work which puts a lot of strain on your body. Future PBA Hall-of-Famer (and newly inducted USBC Hall of Famer) Sean Rash is a great example of someone who has a late swing.
On the other end of swing timing is 6-time PBA Champion (including 2 Majors) Kris Prather’s swing. His swing is complete by the end of his second to his last step and is ready to come down as his last step starts. This timing has his feet, core and swing all traveling forward with the start of his last step which makes his shot effortless and versatile as you can get without having to use muscle.
These pictures show both Sean and Kris entering their slide. Sean’s swing is still going up and higher than it was at the start of his last step as his slide foot is passing his side foot while Kris’ swing is lower and descending when his slide foot is passing his bowling side foot. Sean’s late timing is power player timing and harder on the body, while Kris’ earlier timing is strokers player timing which is effortless and less stressful on the body.
So the moral to the story is you need to understand your timing relative to your swing height. The start of your last step is the key place to look to see your timing. By understanding your timing and swing it will help keep you from trying to do things your game is not built for.
Speed, Timing, Balance
April, 2024
This month’s “Bill’s Tip of the Month” expands on the speed and balance question in this month’s April, 1997 Bowling Digest featured column.
Controlling the speed of your steps and maintaining balance work hand in hand. The speed of your steps is related to the timing of moving your ball at the start of your approach. If you move your ball early your feet will go faster and on the opposite end, if you move your ball later your feet will walk slower. So to control your foot speed pay attention to the speed you move your ball at the start of your approach.
Having a consistent speed when you start the movement of your ball will help your overall timing and enable you to stay balanced at the end of your approach easier.
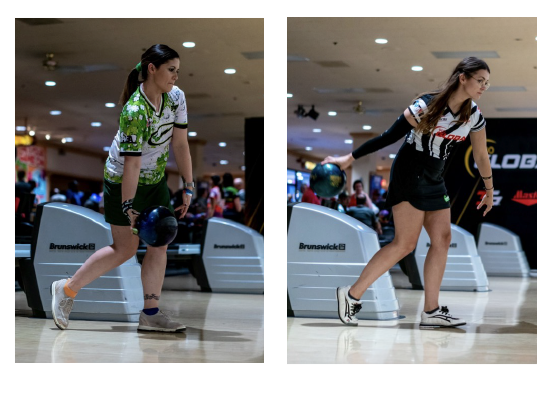
Here are two great examples of two bowlers that use different speed and timing. 5-time PWBA Champion including the 2023 US Open and 2021 PWBA Bowler of the Year, Bryanna Cote has a slower tempo so her ball placement is later into her swing. PWBA Champion and 2017 PWBA Rookie of the Year Daria Pajak has a faster tempo and a longer swing so she gets her ball into her swing earlier. Note where their balls are in the 3rd step of their 5-step approaches below. Both work well, so you need to know what your timing is so you can match your tempo to your ball placement and swing height to get the best results to be balanced at release point.
Roll, Don't Spin
March, 2024
This month’s “Bill’s Tip of the Month” expands on the "From Spinner to Semi-Roller" question in this month’s August, 1995 Bowling Digest featured column.
The most important thing in bowling once you develop a repeatable form is your ball roll. Today more than ever you need a ball roll that is very stable in its reaction to the oil and dry parts of the lane. Too much spin is created when your thumb rotates counterclockwise with your palm going over the top of your ball. When this happens, your ball will slide too much in the oil and can hook too much in the dry—giving you an unpredictable reaction.
How to correct this? 1—Concentrate on keeping your wrist straight and your thumb not moving and pointing it forward towards your middle finger; 2—With your palm behind the ball, release it out in front of your big toe with your palm going through the ball down the lane, not around it.
Your bowling side shoulder going down and forward will provide the turn of your hand—making it very inactive and help prevent you from coming over the top of it.
Your ball needs to be controllable when it exits the oil and encounters the dry. Besides your ball rotation, how your ball is drilled can help—consult your pro shop operator for ball selection and drilling help.
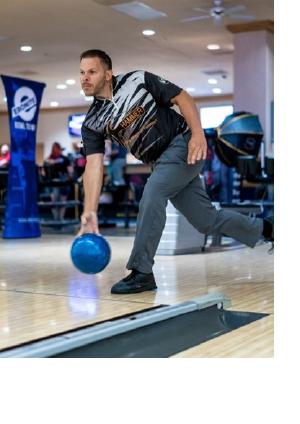
This picture of future PBA Hall of Famer Bill O’Neill shows what your release should look like—Bill’s thumb remains pointed forward in the direction of his middle finger at release. I have no pictures of PBA Touring Pros who spin the ball—as none use a spinner as their A game release.
Body Angles
February, 2024
This month’s “Bill’s Tip of the Month” expands on the questions asked in this month’s February, 1996 Bowling Digest featured column.
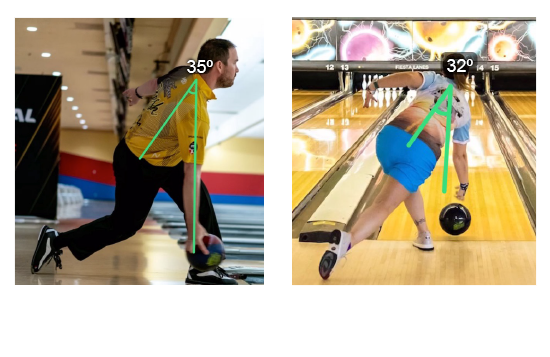
This month's tip is on upper body angles at your release. There is a great difference between what is correct as it varies from bowler to bowler and it’s very dependent on the release the bowler has or is trying to develop. The upper body angles are created by the forward and lateral side tilt of your body’s core.
The basic rule of thumb to follow is the higher your fingers are on your ball when you release it, the less forward and side tilt your body needs. The more under the ball your fingers are at release zone the more lateral and forward tilt is needed in your body. The right amount of tilt for your release should have your bowling arm perpendicular to the floor, the ball by your ankle and under your head from a back view.
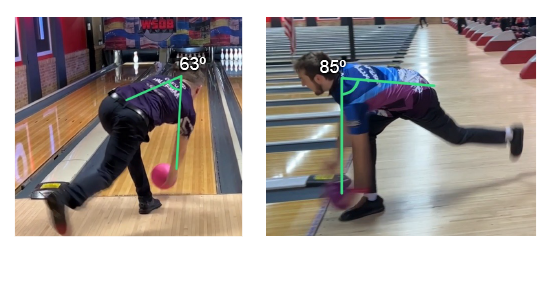
Today’s two-handers exhibit the most side and forward tilt because their fingers are directly under their ball and their angles can range from 85° forward to about 65° side. Players who have their fingers more at the equator of their ball or above need less tilt, ranging from as little as 30° forward and 27° side. So what should you strive for? The more under the ball your fingers are the more your forward and lateral tilt should be and the higher your fingers are on your ball the less forward and lateral tilt you need.
Angle of Entry
January, 2024
This month’s “Bill’s Tip of the Month” expands on the questions asked in this month’s December, 1995 Bowling Digest featured column.
With today's bowling balls, lane surfaces and especially oil patterns, you can create more entry angle compared to when I bowled on the PBA Tour in the 1970's and 1980's when about 2.5° of entry angle was outstanding. Back in the 1970's and 80's more than that was not realistic because most of the lane surfaces were wood and the balls were plastic and rubber. Today reactive resin bowling balls plus today's oil patterns and synthetic lane surfaces all contribute to the ability to get optimum entry angles resulting in higher scores.
But before you worry about what your entry angle is you should concentrate on controlling the pocket. When you have command of the pocket then you can work on creating the correct angle to carry.
The more forgiving the pattern, the more angle you can create because you can miss outside your target line and the ball will hook back, creating more angle. But the longer and tougher the pattern is, less angle of entry is best to control the pocket.
This graphic shows 3 different angles of entries to the pocket along a straight line — 2, 4 and 6°. To create a 6° of entry angle from about 45 feet down the lane that this graph indicates (the red line) is very difficult to do — it looks easier than it appears. The only bowler in my 50+ years of professional bowling as a student, player, and coach that comes close to doing this and being accurate is Jason Belmonte. His ability to be able to do this is why he is the best.

Pay close attention to how your ball is going into the pocket and through the pins to see why you carry or don't. I hear bowlers say all the time after a good pocket hit that didn’t strike "It should have been a strike!" — if it was supposed to be a strike it would have been! Something isn't correct when the location is good and the pins don't fall.
Neil Stremmel's article is a very detailed and technical study of angle of entry, which includes charts showing the angle of entry for the lower average player to professional bowler with the length of a pattern and the optimum board number to strike at. CLICK HERE to read the article.
Using Tape
December, 2023
This month’s “Bill’s Tip of the Month” expands on the questions asked in this month’s April, 1995 Bowling Digest featured column.
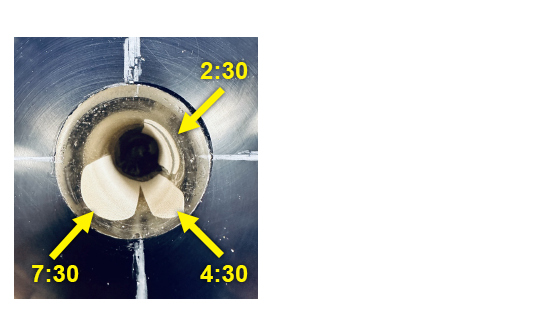
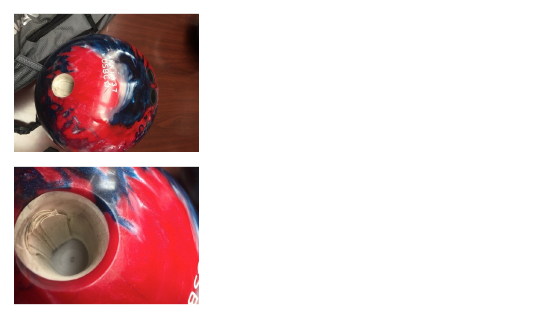
Learning to use tape to adjust the size of your thumb hole if it shrinks or swells is one of the most important things you should learn to do to play at a high level. Humidity, heat, cold and friction can cause your thumb to swell or shrink and prevent you from getting a clean consistent thumb release.
When my students get a new ball I recommend that their thumb hole be large enough to accommodate 3 to 5 pieces of tape when their thumb is normal size. I train all my students how to use tape correctly relative to their thumb shape—whether they have a round, flat, or oval thumb.
It’s critical that you have a firm hand position without excessively gripping your thumb hole—sizing your thumb hole correctly helps you do that. Excessive griping shortens and slows your swing down and decreases your chances of executing a good consistent release.
Everyone’s thumb shape is different and taping and shaping your thumb hole is an art that takes time to learn. Regardless of the system you use, learning to tape is critical if you want to increase your scores.
Making the 10-pin
November, 2023
This month’s “Bill’s Tip of the Month” expands on the questions asked in this month’s June, 1996 Bowling Digest featured column.
Making the 10-pin for a righty or the 7-pin for a lefty is many times the most dreaded spare for bowlers. There are some things you can do to help make them.
The first thing you need to do is make a decision on the ball you want to use—preferably a non-hooking, very hard, polished ball that doesn’t hook. With a non-hooking type of ball you should use a release close to your strike ball release with a couple of adjustments. First of all, let your ball roll more off the front of your hand reducing your turn. Second you should reduce your rev rate a little. What you shouldn’t do is change your style by trying to throw the ball hard—you should try to maintain your normal form and tempo.
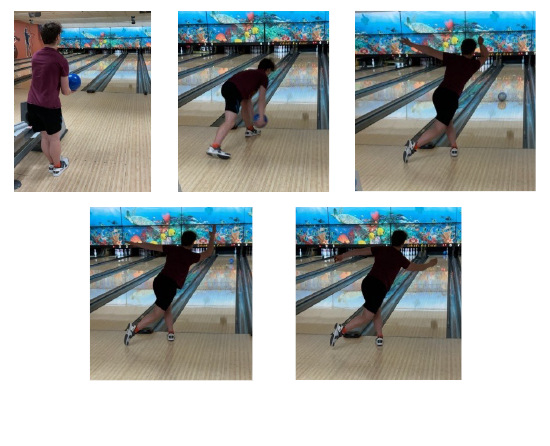
Bobby Habetler shows the proper form to pick up a 10-pin
The next decision is where you should stand. It should be the opposite corner of the pin you are aiming at so you can roll your ball across the middle of the lane with your target around the middle arrow. Next, align your sternum to the pin, draw an imaginary line from the pin back to the arrows and ultimately to you. The mental thought is you want your ball to travel along that line to the pin. Then let your arm swing through to your finish position without using your hand to guide the ball. Let your body angle and swing project the ball along your intended line.
With the proper alignments and mental picture of what you want to do will greatly help you conquer those pesky corner pins.
Sliding vs. Planting
October, 2023
This month’s “Bill’s Tip of the Month” expands on the questions asked in this month’s October, 1995 Bowling Digest featured column.
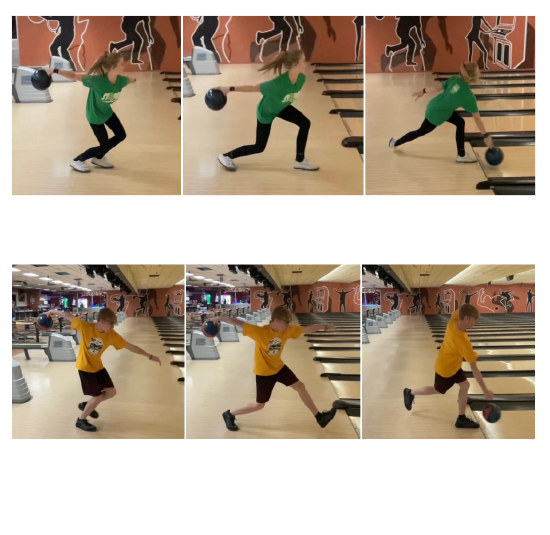
To slide or not to slide? Basically, there are two ways your last step can go. The first is your foot lands flat with your knee flexed which promotes a slide which can vary greatly in length depending on your timing. The other is a plant which happens when the toe of your last step points upward and your heel makes contact with the floor first. In this case your leg generally straightens out which causes you to have an abrupt finish to your shot.
For the overwhelming majority of bowlers sliding is better. It allows you to have a smoother finish, and you can develop a more well-rounded game allowing you to play more angles with different releases. Planting on the other hand restricts your ability to play a lot of angles because in the last step of your approach your knee will straighten out causing your upper body to get way behind your foot. When your foot finally lands flat your upper body needs to advance forward quickly to get it in the correct position to release your ball out in front of you onto the lane. Planters are better at rolling the ball with straighter angles because of the big upper body shift planting creates, it just doesn’t allow much time to finesse the release.
Changing from being a planter to a slider is very difficult if you have been doing it for a long time. Instead of trying to change to sliding I suggest you work on taking shorter steps, playing straighter angles, and rolling the ball. This way you can maximize on what planting allows you to do.
These pictures of my students Abby Starkey and Cody Hadley show the beginning, middle and release positions of the last step of a slider and a planter. Whether you are a slider or a planter the key thing with your last step—and really for most of your steps—is you want your head over your leading foot as that step finishes. Both players do this—but get to their last step differently.
Playing Wet-Dry Lane Conditions
September, 2023
This month’s “Bill’s Tip of the Month” expands on the questions asked in this month’s September/October, 1994 Bowling Digest featured column.
Playing today’s typical wet-dry house shot condition can be tricky—even though it’s very high scoring. A wet-dry condition normally will have very heavy oil from about the 8 board on the right to about the 8 board on the left and no oil from about the 8 board to the gutter on each side of the lane and the oil length will be 40-43 feet long. 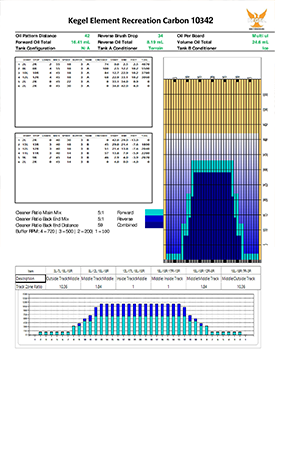 The problem with this type of oil pattern is the ball hooks immediately in the dry area (right of the ~8 board on the right and left of the ~8 board on the left) and if you move into the oil (from ~8 board inward) the ball can slide all the way to the end of the pattern. This makes controlling your ball’s break point very touchy.
With a very wet-dry pattern when you miss your ball either over hooks if you miss out or under hooks if you miss in. This makes your down-lane miss actually the opposite of how you actually missed.
What you must do is decide if you want to play the oil or the dry. If you decide to play the dry you need speed, lower rev rate and turn, and use a ball that doesn’t change its direction quickly when it starts to hook. If you decide to play the oil you’ll need to use a ball with some surface on it so it rolls in the oil and won’t over skid and when it gets to the dry down the lane it doesn’t over hook. You would use your normal rev rate and turn.
So the moral to the wet-dry lane condition story is you need low reacting balls and releases to help you control the side-to-side reaction of your ball to consistently hit the pocket.
The Value of Footwork
August, 2023
This month’s “Bill’s Tip of the Month” expands on the questions asked in this month’s April, 1996 Bowling Digest featured column.
One of the most important things in bowling is your walk. Your feet are the only thing that comes in contact with the bowling environment. As with any sport it all starts with the feet, without them nothing moves.
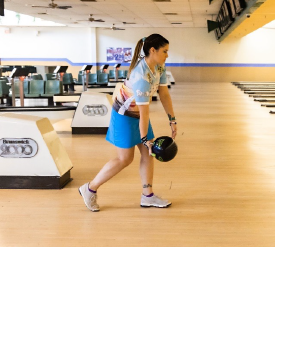 First off, the length of your steps are very important—they need to be the right length so that ideally at the completion of each step your head is over the leading foot as that step is complete. That way your upper body is leading you to the foul line and your feet and legs are pushing your upper body forward. Two-handers naturally create this because they use a lot of forward tilt.
The second important thing with your steps is direction. My pet quote for a right-handers walk direction is “left is right, right is wrong and straight is ok” (it’s the opposite for left-handers). Sticking with righties, walking right is wrong because you walk into your swing and your swing has a good chance of getting blocked behind your back. This will make your downswing have to go around your body, with any slight variance in the timing of the ball off your hand can severely affect the direction your ball will travel. If you release the ball early it will miss right, if you release late your ball will miss left, and an on-time release your ball will travel on the correct line.
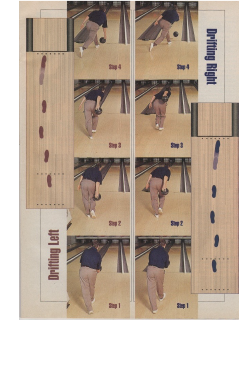 On the other hand, walking left early in your approach allows you to get out of the way of your swing. This in turn allows your swing to move in closer to your body on your downswing creating a straight, inside out swing to your release. With your swing traveling in a straight line from the top of your downswing to your release (instead of having to go around your body) it gives you much more leeway on the timing of the ball off your hand to travel the correct direction down the lane. This type of downswing path is what all successful professional bowlers have which helps make them very versatile.
Walking straight is also good—players that walk straight generally roll their ball straighter down the lane and are very consistent. The draw back with a perfectly straight walk is it’s difficult to play inside angles and swing the ball out away from the pocket.
Pay attention to your feet right from your stance and the direction they are going to the foul line. If you can’t do certain things, it’s probably your footwork and swing direction preventing you from doing it. Getting help to correct your flaws and understanding them will go a long way to help you improve.
Equipment Selection
July, 2023
This month’s “Bill’s Tip of the Month” expands on the questions asked in this month’s August, 1997 Bowling Digest featured column.
Picking out the right ball for you can be very complicated or easy. If you are a once a week league bowler and bowl in one house on one oil pattern you only need 3 bowling balls—1) one ball for fresh oil that goes into a roll early and doesn’t over hook on the dry backends; 2) another ball to change to when your first ball starts hooking early causing it to lose energy and hit soft--this ball should be one that goes longer before hooking so when it starts to hook it has a stronger/more pronounced back end hook; and 3) a non-hooking spare ball.
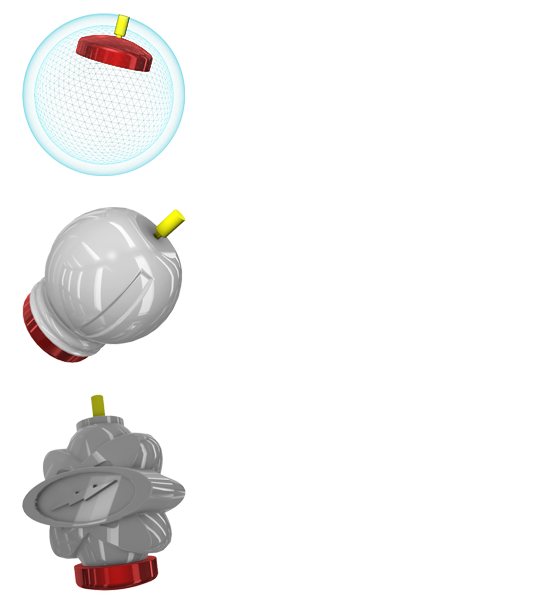
For the bowler playing multiple leagues a week in different bowling centers and occasionally playing some tournaments the number of bowling balls needed will increase. You might have up to 6 balls to cover a wider variety of lane conditions—you might have a couple of asymmetrical core balls and a few symmetrical core balls. The key thing is to have a variety of cover stocks—pearl, hybrid and solids. The next important thing is understanding what the different cover stocks do and how your balls are drilled. You basically need to be able to look at your equipment and know what to expect out of the ball relative to the core, cover stock, and drilling layout. It’s not easy to understand, but very important so you can make more educated decisions about what ball to go to when the one you’re using doesn’t work. It’s worth the time to learn this so you can make quicker, educated ball selection decisions.
Developing a Sound Targeting System
June, 2023
This month’s “Bill’s Tip of the Month” expands on the spot bowling question in this month’s May/June, 1994 Bowling Digest featured column.
Developing a sound targeting system for your game is fundamental to developing consistency. It’s not about hitting a spot—it’s about getting the ball to travel the correct direction down the lane in relationship to how the oil pattern dictates the lane to be played.
The easiest and best way to do this has always been to use the arrows and the boards between them. You first need to know the lane and approach by board numbers because they will give you reference points that are vital in making logical adjustments.
Knowing the basic math of adjustments using the approach and lane board numbers will give you an idea how much you should be adjusting. If you move your feet one board left and keep your target at the arrows on the same board the effective adjustment is 3 boards at 60 feet, which is the distance the head pin is from the foul line. That one board move with your feet creates an angle change that your ball travels through your target. If your ball continues on that angle change it would go 1 board to the right at 30 feet, then 2 boards right at 45 feet and then end up 3 boards right at 60 feet. Now if you move your target 1 board right and keep your feet in the same place the effective adjustment is 4 boards--One at 15 feet, 2 at 30 feet, 3 at 45 feet then end up 4 at 60 feet.
You don’t have to see your ball hit a spot—you need to see your ball early enough traveling down the lane to understand what your ball is doing then make logical adjustments based on your ball reaction. That’s why understanding the basic math of your adjustments is imperative—you make your adjustments based on mathematical facts—not from guessing what to do.
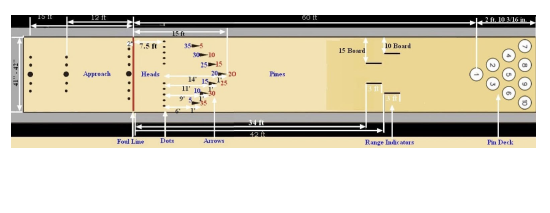
There has always been talk about the pros targeting 40 to 50 feet down the lane. When a player does that, it’s only used to pick out a destination they want their ball to get to at their break point. But they always draw their eyes to a closer target which normally is at the arrows—some pros such as Pete Weber, Liz Johnson and Wes Malott even continue all the way to the foul line.
The more you can take guess work out of our game, the higher the probability your scores will increase. Until you know the basic math of adjustments you really can’t progress to the next level of lane play.
Wrist issues? Add a gripping hole
May, 2023
This month’s “Bill’s Tip of the Month” expands on the extra finger hole question in this month’s October, 1997 Bowling Digest featured column. The following is Bill’s follow-up to his 1997 column.
One question I get asked frequently is “What can I do about a sore wrist and what will help it without having to stop bowling”? So when I decided to add a “Tip of the Month” to my monthly newsletter, I was happy to see this question addressed in my October, 1997 Bowling Digest.
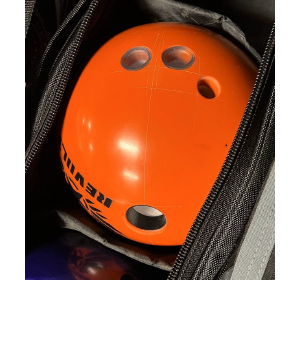 Totally coincidentally BOWL-TV’s Analyst Craig Elliott asked me the same thing when I did some guest live-streaming commentary on BOWL-TV last month during the PBA World Series of Bowling in Wauwatosa, WI. The conversation developed with him and Mike Flanagan, BOWL-TV’s Lead Analyst and I told them that in early January of this year 7-time PBA Champion Dick Allen called me for some advice. He was experiencing severe wrist pain and was looking for some answers so he could continue to bowl. After some conversation I had two recommendations for him: 1) add a pinky finger hole and 2) go to a lighter ball. Dick did both—he went from 15 to 14 lb. balls and added a pinky finger hole as shown in the picture. He was able to bowl the 60 games of competition and probably another 15 games of warm-up and practice pain free.
What the pinky finger does is it helps make the ball feel lighter and easier to roll because it helps reduce your grip pressure. I have always recommended it to those with wrist problems, seniors, and those who want to continue using a heavier ball.
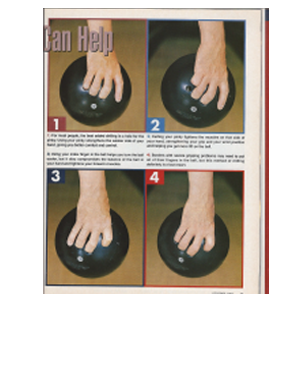
There have been a number of Hall of Fame players that have used extra gripping holes—Kim Adler, Mark Williams, Pete Couture and myself—all used pinky finger holes with success. Two other Hall of Famers have used an index finger hole for help—Dana Miller-Mackie and Steve Fehr.
Don’t be reluctant to try something out of the norm. Remember if you add an extra gripping hole that every hole has to have a finger in it to be a legal delivery now — it wasn’t that way back in 1997.
BTW if you aren’t a subscriber to BOWL-TV yet, you should be. Fantastic coverage of the PBA, PWBA and other important USBC events at a great price of $119.95 yearly or $12.95 a month (plus 15% transaction fee and applicable taxes). In my opinion, it’s one of the best values in bowling.

